Secure60 Windows Log Receiver
Overview
The Secure60 Windows Log Receiver is the agentless option for collecting Windows event logs. It uses Windows Event Forwarding: Windows servers send events directly to Secure60 with no agent installed on the Windows host. The receiver accepts and processes these events for your Secure60 project.
For more on Windows Event Forwarding, see the Microsoft documentation.
Requirements
- Deploy the Secure60 Windows Log Receiver module (Part 1) on a host reachable by your Windows servers.
- Open port 5986 from Windows servers to the host running the receiver (standard port for Windows Event Forwarding).
- On each Windows server: install a client certificate and CA certificate (used to validate the Windows server to the receiver). Kerberos is also supported in some deployments.
- Permissions to configure local Windows policy on each Windows server (or use Group Policy at scale).
Part 1 — Secure60 Windows Log Receiver module deployment
Deploy the receiver module on your infrastructure so Windows servers can forward events to it. You run the Secure60 Windows Log Receiver container; there is no build step.
Prerequisites
Before running the container you need:
- Receiver configuration file — Specifies hostname, bind address, HTTPS port (5986), TLS certificate paths, and database path. See Receiver configuration file below.
- Certificates — A directory (e.g.
win-log-cert/) containing:ca-cert.pem— CA certificateserver-cert.pem— Server certificateserver-key.pem— Server private key
Secure60 or the certificate generation process provided with the module produces these for secure communication with Windows servers.
- Subscription configuration — One or more subscription files that define which Windows event logs to collect and where to send them (e.g. to your Secure60 Collector). See Subscription configuration below.
- Persistent storage — Two host directories for the receiver’s database and event data (e.g.
win-log-db/andwin-log-data/). Create these on the host before first run.
Receiver configuration file
Create a receiver configuration file (e.g. secure60.conf.toml) in the same directory as your compose.yaml. Set hostname to the FQDN that Windows servers will use in their Subscription Manager string (e.g. the hostname of this host). Replace <receiver-hostname> with your value.
# Secure60 Windows Log Receiver — main configuration

[database]
type = "SQLite"
path = "/var/lib/openwec/db/db.sqlite"

[[collectors]]
hostname = "<receiver-hostname>"
listen_address = "0.0.0.0"
listen_port = 5986

[collectors.authentication]
type = "Tls"
ca_certificate = "/etc/ca-cert.pem"
server_certificate = "/etc/server-cert.pem"
server_private_key = "/etc/server-key.pem"

[logging]
verbosity = "debug"
access_logs = "stdout"
Subscription configuration
The receiver uses subscription files in a directory (e.g. win-log-conf/) to define what to collect and where to send events. Create the directory and add at least one subscription file (e.g. 01-simple.toml).
- uuid and name — Use a unique UUID and name per subscription.
- query — Windows event query (XML). The example below collects Application, Security, Setup, and System logs; adjust as needed.
- outputs — Where to send events. The example writes to a local path and forwards over TCP to a Secure60 Collector. Replace
<your-secure60-collector-host>with your Secure60 Collector host or IP, and change9000if your Collector listens on a different port.
# win-log-conf/01-simple.toml — example subscription

uuid = "e493fa95-4810-4c61-8ac7-7fa8d028a144"
name = "simple"

query = """
<QueryList>
    <Query Id="0" Path="Application">
        <Select Path="Application">*</Select>
        <Select Path="Security">*</Select>
        <Select Path="Setup">*</Select>
        <Select Path="System">*</Select>
    </Query>
</QueryList>
"""

[[outputs]]
driver = "Files"
format = "Raw"
config = { path = "/var/lib/openwec/data/simple/messages" }

[[outputs]]
driver = "Tcp"
format = "Json"
config = { addr = "<your-secure60-collector-host>", port = 9000 }
You can add more subscription files (e.g. 02-another.toml) with different UUIDs, names, and queries. Ensure the TCP output addr and port point to your Secure60 Collector instance.
Running the module
Use the pre-built image secure60/s60-win-log-receiver. Expose ports 5985 (HTTP) and 5986 (HTTPS). Windows Event Forwarding uses 5986; ensure that port is open from your Windows servers. Mount the configuration file, config directory, certificate files, and persistent storage as in the example below. Create the host directories win-log-db and win-log-data before first run.
Example using Docker Compose:
services:
  s60-win-log-receiver:
    image: secure60/s60-win-log-receiver:latest
    container_name: s60-win-log-receiver
    restart: unless-stopped
    ports:
      - "5985:5985"
      - "5986:5986"
    volumes:
      # Receiver configuration file (read-only)
      - ./secure60.conf.toml:/etc/openwec.conf.toml:ro
      # Subscription config directory (read-only)
      - ./win-log-conf/:/etc/openwec.d/:ro
      # Certificate files (read-only)
      - ./win-log-cert/ca-cert.pem:/etc/ca-cert.pem:ro
      - ./win-log-cert/server-cert.pem:/etc/server-cert.pem:ro
      - ./win-log-cert/server-key.pem:/etc/server-key.pem:ro
      # Persistent data (receiver database and event data)
      - ./win-log-db:/var/lib/openwec/db/
      - ./win-log-data:/var/lib/openwec/data/
Start the receiver:
docker compose up -d
Check logs:
docker compose logs -f s60-win-log-receiver
Ports
- 5986 — HTTPS port used for Windows Event Forwarding. Ensure this port is open from your Windows servers to the host running the receiver.
- 5985 — HTTP port (optional); required only if you use non-HTTPS connections.
Post-deployment
- Firewall — Allow inbound TCP 5986 from the Windows servers (or their network) to the host where the receiver runs.
- Certificates — Confirm the certificate files exist and are readable by the container; fix permissions if needed.
- Troubleshooting — If the receiver does not start, check: certificate paths and permissions, port 5986 not in use, and that configuration file paths match what the container expects (see your deployment package).
Part 2 — Windows server setup
Configure each Windows server to forward events to the Secure60 Windows Log Receiver. You will need the Subscription Manager string and client certificate pack from Secure60 (generated when you provide the Windows server hostname).
Step 1: Provide hostname to Secure60
On the Windows server, run:
hostname
Send this hostname to the Secure60 team. They will generate a client certificate pack and the Subscription Manager string for this server.
Step 2: Install certificates on the Windows server
2.1 Install the client certificate
- Open Certificate Manager (
certmgr.msc). - Under Personal, right-click Certificates and choose All Tasks > Import….
- Complete the import wizard and select the client certificate file from the pack provided by Secure60.
- Important: Enable Include all extended properties during import.
2.2 Install the CA certificate
- In Certificate Manager, go to Trusted Root Certification Authorities > Certificates.
- Right-click Certificates and choose All Tasks > Import….
- Import the CA certificate (for the CA that signed the receiver’s server certificate) from the pack provided by Secure60.
2.3 Grant Network Service access to the client certificate
- In Certificate Manager, open Personal > Certificates and locate the client certificate you imported.
- Right-click the certificate and choose Manage Private Keys.
- Add the NETWORK SERVICE account and grant it Read permission.
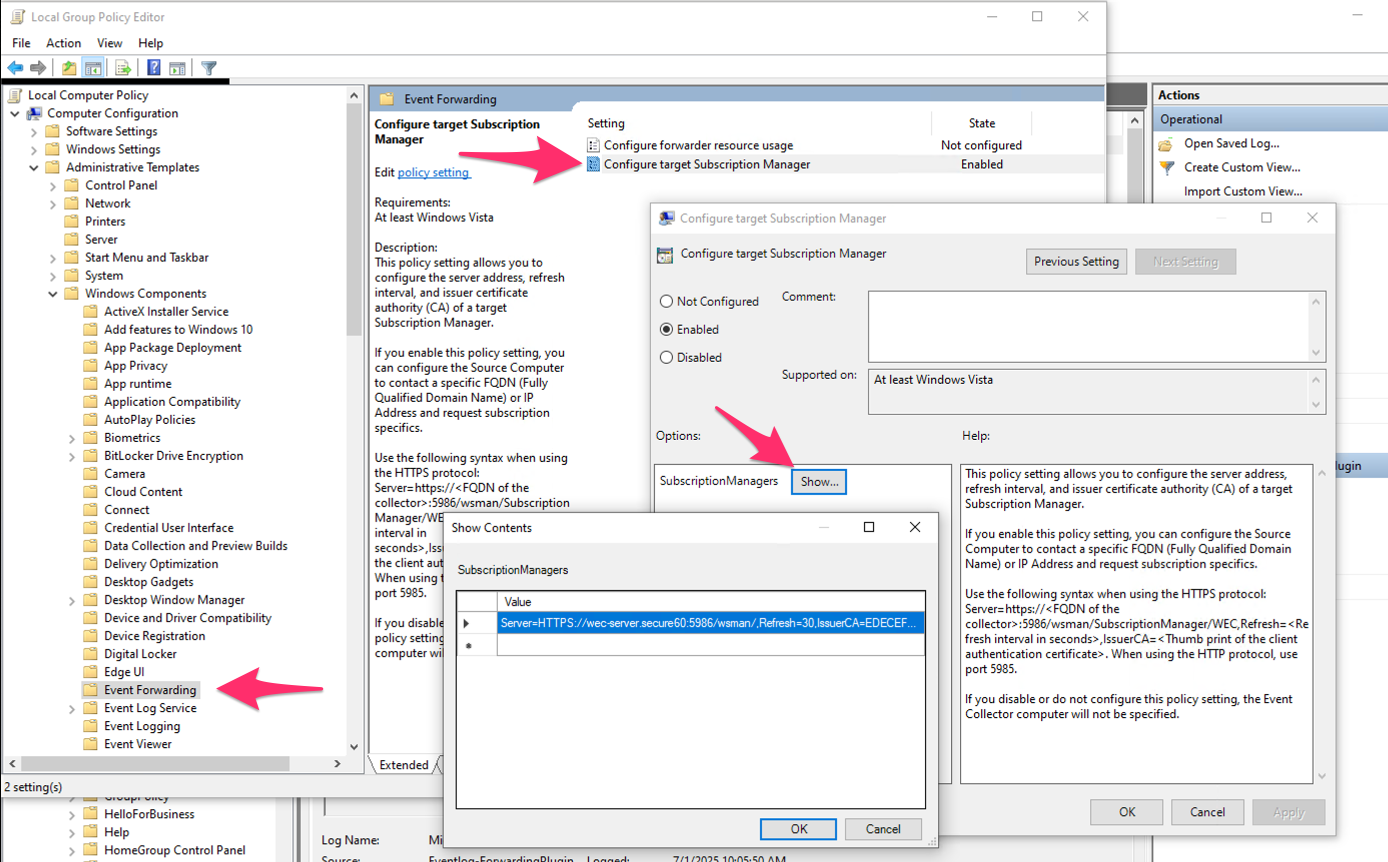
Step 3: Configure Event Forwarding policy
- Open Local Group Policy Editor (
gpedit.msc). - Go to Computer Configuration > Administrative Templates > Windows Components > Event Forwarding.
- Double-click Configure target Subscription Manager.
- Select Enabled.
- Click Show… next to SubscriptionManagers.
- Add the Subscription Manager string provided by Secure60 (one line per subscription manager).
Syntax:
Server=https://<collector FQDN>:5986/wsman/,Refresh=<seconds>,IssuerCA=<CA thumbprint>
Example:
Server=HTTPS://wec-server.secure60:5986/wsman/,Refresh=30,IssuerCA=<thumbprint>
Use commas between Server=..., Refresh=..., and IssuerCA=.... Replace <collector FQDN> with the hostname or FQDN of the host running the Secure60 Windows Log Receiver, and <thumbprint> with the CA certificate thumbprint provided by Secure60.
Step 4: Enable Security Event log forwarding permission
Windows must allow the forwarder to read the Security event log.
User right — Manage auditing and security log
- In Local Group Policy Editor, go to Computer Configuration > Windows Settings > Security Settings > Local Policies > User Rights Assignment.
- Open Manage auditing and security log.
- Add NETWORK SERVICE.
Event Log Readers group
- Go to Computer Configuration > Windows Settings > Security Settings > Restricted Groups.
- Right-click Restricted Groups and choose Add Group….
- Enter Event Log Readers and click OK.
- In Members of this group, add NETWORK SERVICE (and keep any existing members).
Non–domain-joined servers: Use Local Users and Groups (lusrmgr.msc): open Groups, select Event Log Readers, add NETWORK SERVICE.
Step 5: PoC vs production — name resolution
Proof of concept: Add a hosts file entry so the Windows server can resolve the receiver’s FQDN:
- Open
C:\Windows\System32\drivers\etc\hostsas Administrator. - Add a line:
<receiver IP> <receiver FQDN>(e.g. the FQDN used in the Subscription Manager string). - Save the file.
Production: Use DNS so the Windows server resolves the receiver’s FQDN; no hosts file change.
Step 6: Ensure Windows Remote Management is running
Check the service:
sc query winrm
If it is not running, start it:
net start winrm
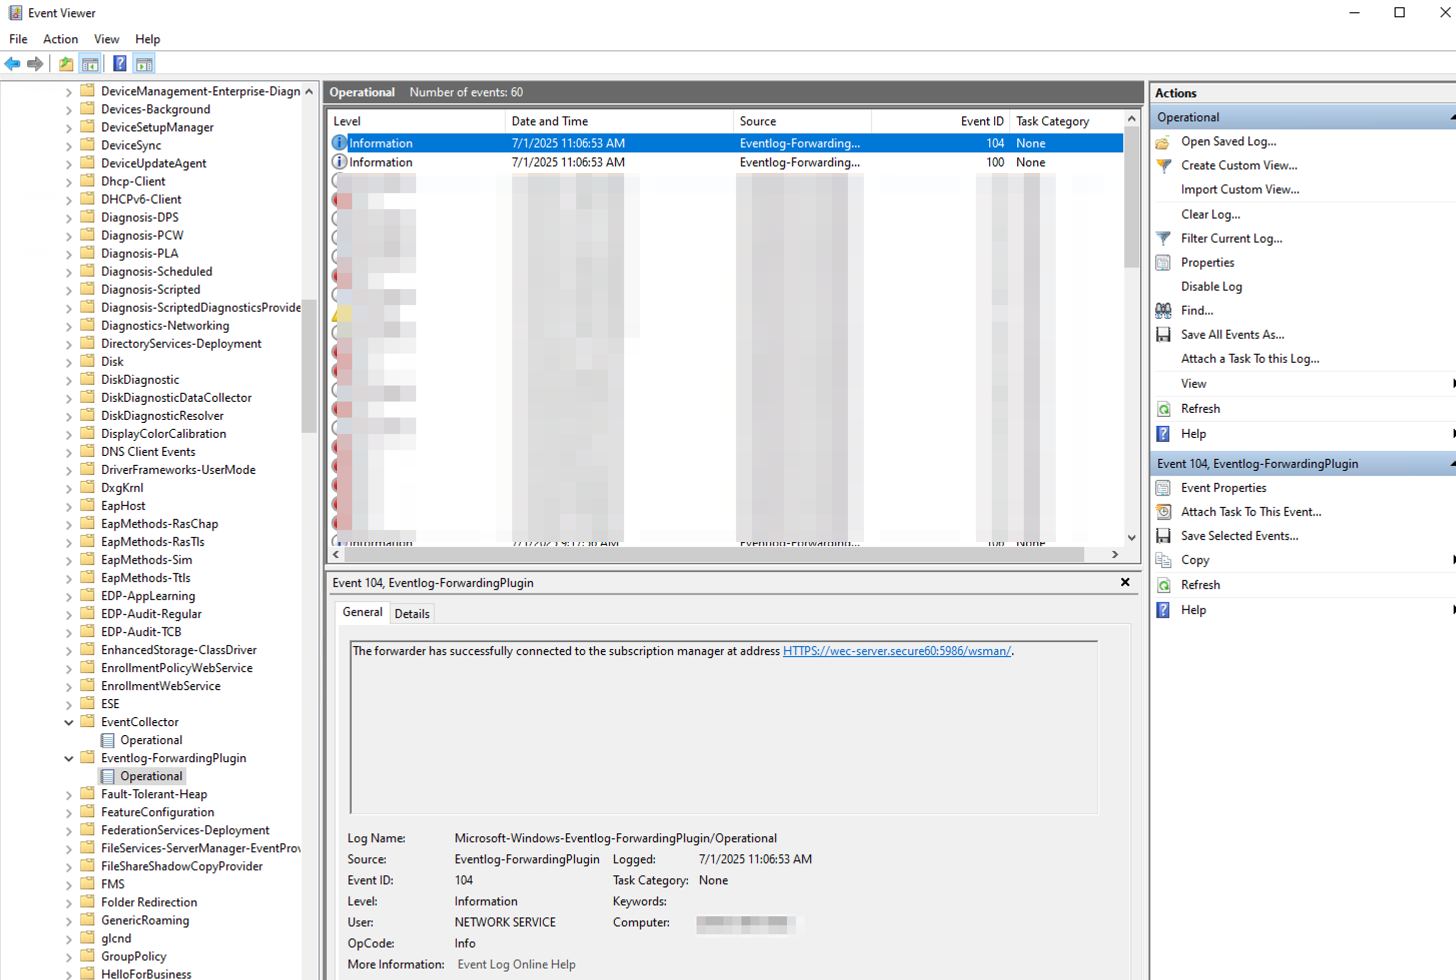
Step 7: Verify forwarding
- Open Event Viewer (
eventvwr.msc). - Go to Applications and Services Logs > Microsoft > Windows > Eventlog-ForwardingPlugin > Operational.
- Look for Event ID 104 — this indicates the forwarder has successfully connected to the subscription manager. Check for any error events if forwarding does not work.
Troubleshooting
- Proxy — If the Windows server uses a proxy, it may block the connection. Check with:
netsh winhttp show proxy
Configure proxy or exceptions as needed so the forwarder can reach the receiver on port 5986. - Certificates — Confirm the client and CA certificates are installed in the correct stores and that NETWORK SERVICE has read access to the client certificate’s private key.
- Port 5986 — From the Windows server, verify the receiver host is reachable on TCP 5986 (e.g.
Test-NetConnection -ComputerName <receiver FQDN> -Port 5986). - DNS / hosts — For PoC, ensure the hosts file entry matches the FQDN used in the Subscription Manager string.
- Windows logs — Success: Eventlog-ForwardingPlugin > Operational, Event ID 104. For service or connectivity issues, check Windows Logs > System (e.g. WinRM source).
For more detail on Windows Event Forwarding setup, see the Windows Event Forwarding Guide under Guides.