Governance Lifecycle Workflow
This guide walks through the end-to-end governance lifecycle in Secure60 — from deploying your first compliance framework through to automated compliance monitoring via rules. Each step builds on the previous one, taking you from an empty register to a fully managed, continuously monitored compliance programme.
For detailed settings and feature reference, see the Governance & Compliance Management Guide. For a high-level overview of capabilities, see the Governance, Risk & Compliance Solution page.
Step 1 — Deploy a Compliance Framework
The fastest way to get started is to deploy a pre-built compliance framework template. Secure60 maintains templates for common frameworks including ISO 27001:2022, PCI DSS, SOC 2, NIST CSF, and the ASD Essential Eight. Contact support@secure60.io to request the template you need — additional templates can be made available on request.
Once a template has been made available to your organisation:
- Navigate to Governance in the left-hand menu
- Click the Templates tab
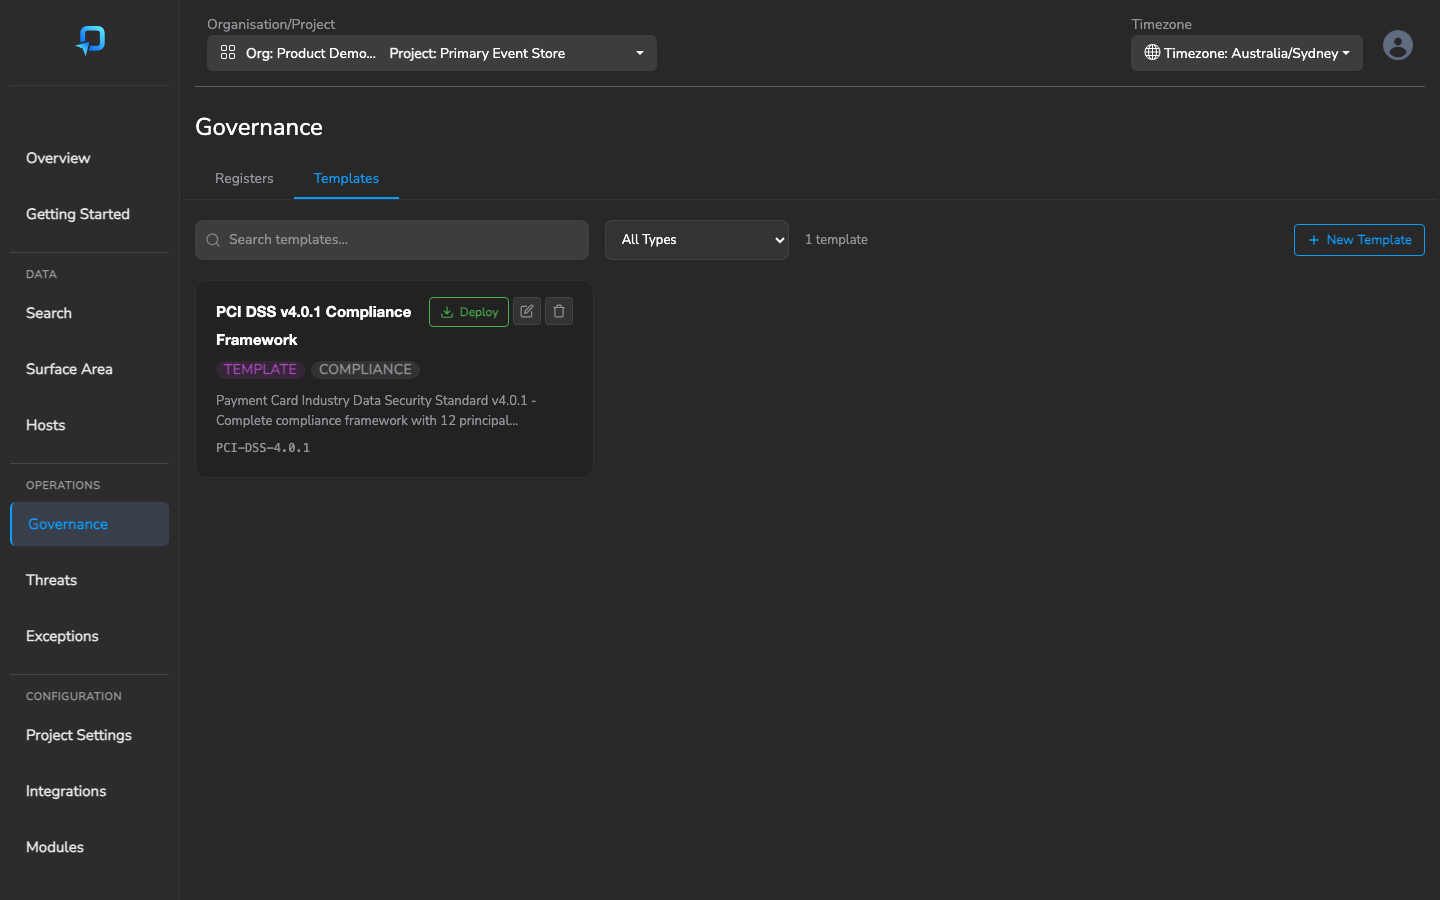
- Find your template and click Deploy
- Give the register a name that identifies the framework and assessment period (e.g. “ISO 27001:2022 — 2026 Assessment”)
- The template deploys a complete register with all control groups and individual controls pre-populated
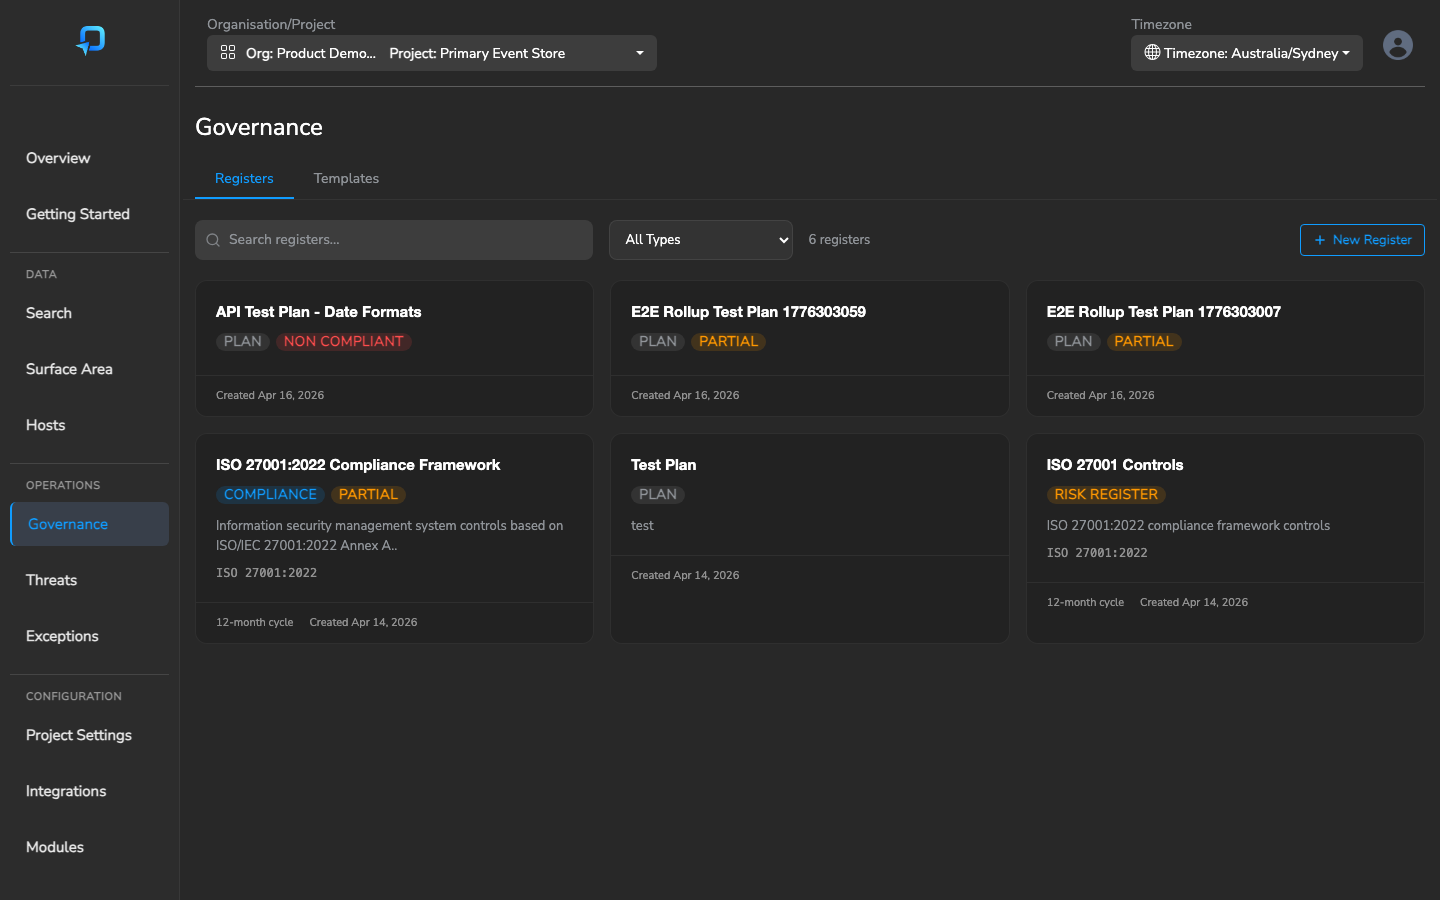
You now have a fully structured compliance register ready for assessment. Every control from the framework is in place — you don’t need to build anything from scratch.
Step 2 — Assess Your Controls
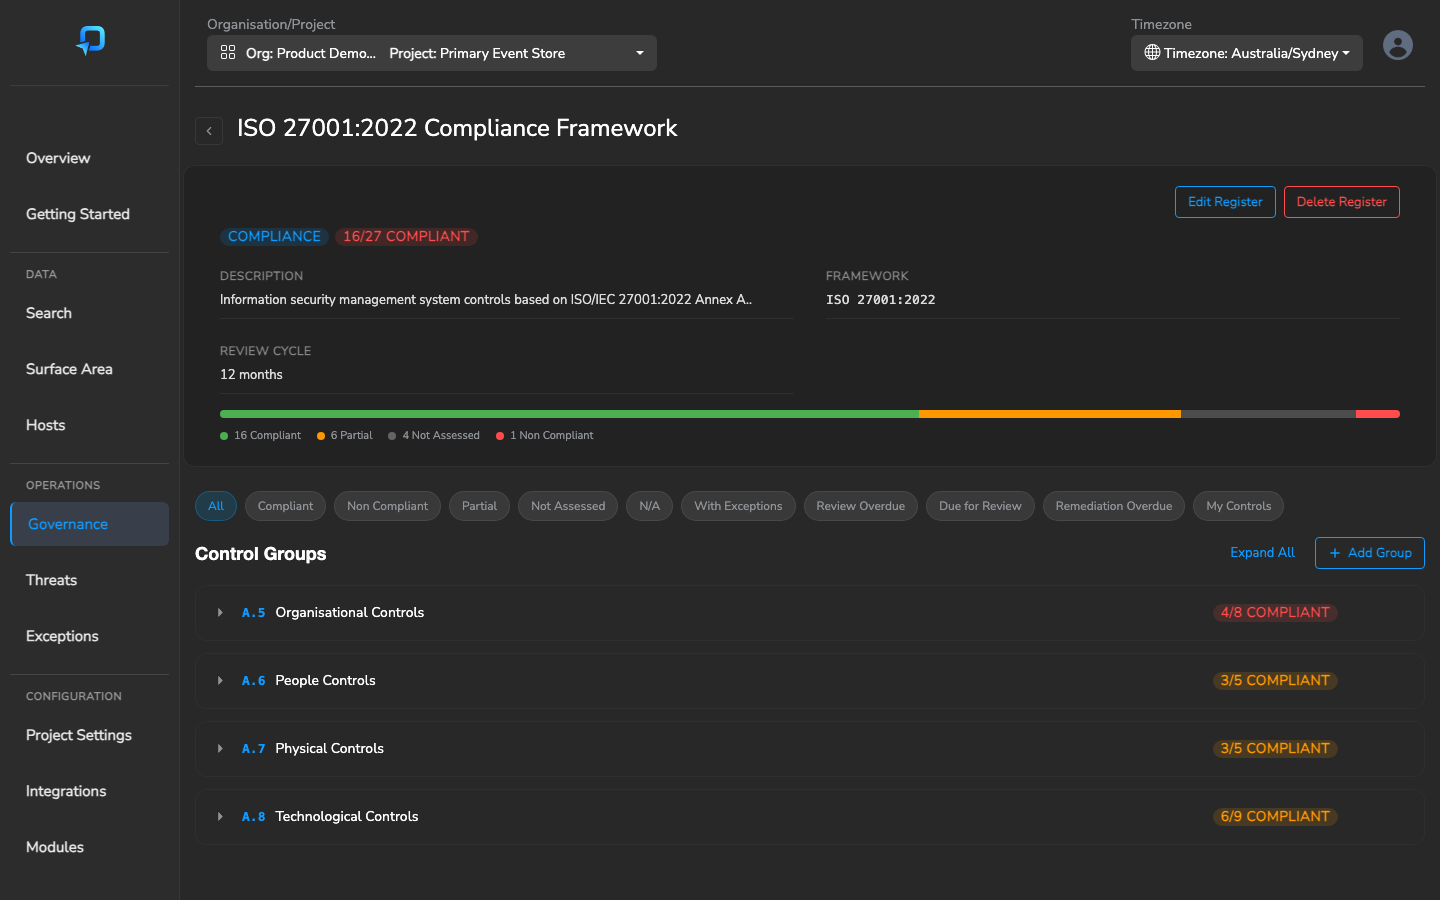
With a register deployed, the next step is to work through each control and assess your organisation’s current compliance posture. The Assessment Drawer is the primary workspace for this.
- Open your register and expand a control group to see the individual controls
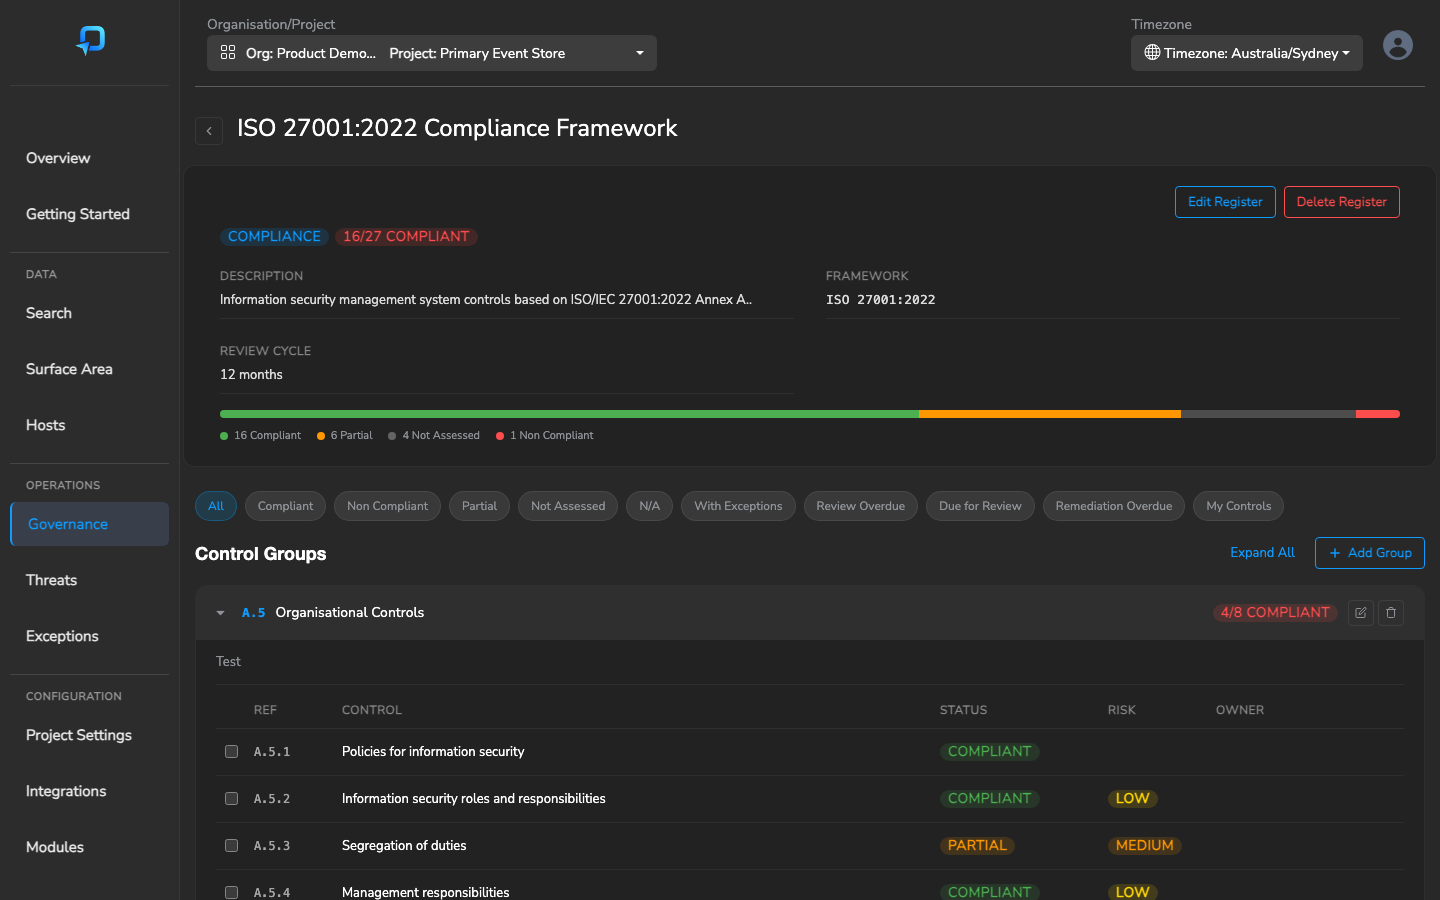
- Click any control row to open the Assessment Drawer
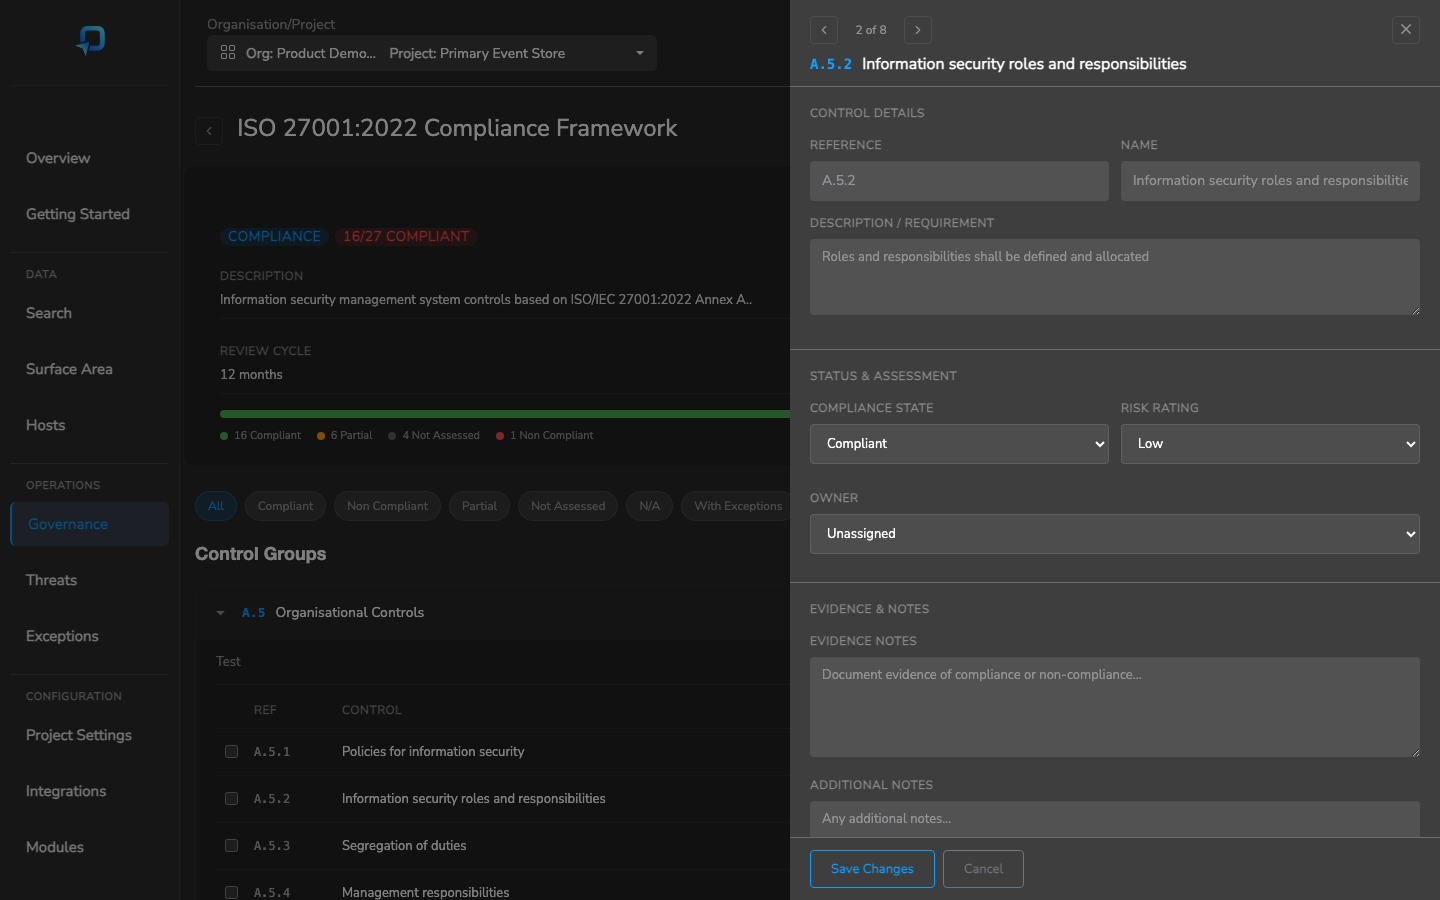
- For each control, set:
- Compliance Status — Compliant, Non-Compliant, Partial, Not Assessed, or Not Applicable
- Risk Rating — Critical, High, Medium, Low, or Info
- Remediation Due Date — if the control is Non-Compliant or Partial, set a target date for remediation
- Click Save Changes
Use the Prev/Next arrows at the top of the drawer to move sequentially through controls without closing the drawer. When filters are active, prev/next respects the filtered set — so you can filter to “Not Assessed” and work through them in order.
For large frameworks, use bulk actions: select multiple controls using the checkboxes and apply a status to all of them at once. Bulk actions also support owner assignment and review submission — covered in Steps 4 and 5 below.
After each save, the compliance rollup automatically recalculates at the control group and register level, giving you an at-a-glance view of your overall posture.
Step 3 — Link Evidence
Evidence turns a compliance assessment from a self-declaration into an auditable record. For each control, attach evidence that documents how your organisation meets (or is working towards meeting) the requirement.
Open the assessment drawer and click + Add Attachment in the Attachments section.
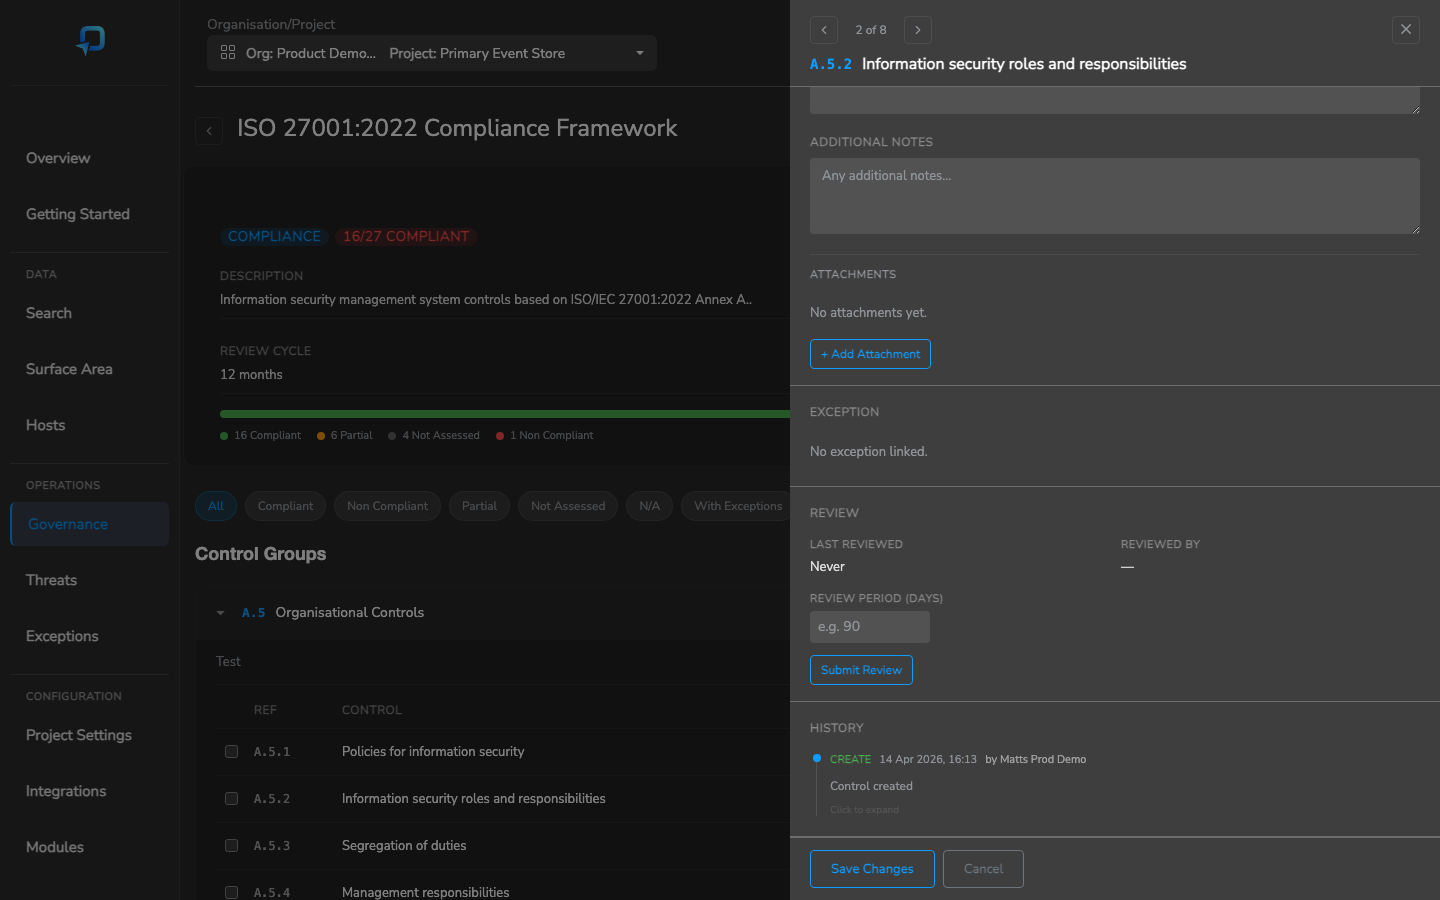
Choose the evidence type that best fits what you’re documenting:
- URL — Link to external documentation such as your organisation’s wiki, Confluence, SharePoint, or any third-party system where policies and procedures are maintained
- File — Upload documents directly (PDF, DOCX, XLSX, CSV, TXT, PNG, JPG, GIF — up to 10MB per file) for policies, audit reports, or certificates
- Portal Page — Link to pages within the Secure60 portal itself (Hosts, Threats, Surface Area, Search, Exceptions, Governance, Analytics) to connect compliance controls to live security monitoring data
- Report Link — Reference specific Analytics & Reporting reports as evidence
- Note — Free-text notes documenting how the control is met, implementation details, or context for auditors
You can attach multiple evidence items to a single control. The goal is to create a trail that an auditor can follow — from the control requirement, through your evidence, to verification that the control is being actively maintained.
Step 4 — Set Up the Review Process
Compliance isn’t a one-time exercise. Controls need periodic re-assessment to confirm that evidence is still current and the organisation remains compliant. Secure60 automates this with configurable review periods and email notifications.
Assign Control Owners
Each control can be assigned to a responsible owner — the person who will be reminded to re-assess the control on a regular basis.
- Open the assessment drawer for a control and use the Owner dropdown
- For efficiency, use bulk owner assignment: select multiple controls using the checkboxes and assign an owner to all of them at once
- Owners can use the My Controls filter to quickly find everything assigned to them
Assign a Register Owner
Each register has a single Register Owner — typically a compliance lead, CISO, or ISO — who is accountable for the overall state of the register. The register owner performs periodic attestation signoffs (Step 5) and receives their own dedicated reminder emails. This is a separate role from the individual control owners.
- Open the register and click Edit
- Set the Register Owner field
- Save
Configure Review Periods
Set how often controls should be re-assessed:
- Register level — Set a default review cycle (in months) when creating or editing the register. This applies to all controls unless overridden
- Per-control override — Override the register default for individual controls that need more or less frequent review. Set the Review Period (Days) field in the assessment drawer (e.g. 1 for daily, 7 for weekly, 30 for monthly, 90 for quarterly, 365 for annual)
Set Up Notifications
Each user can configure their notification preferences for both control-level and register-level reviews. Secure60 sends one consolidated digest email per day per user, covering everything they’re accountable for.
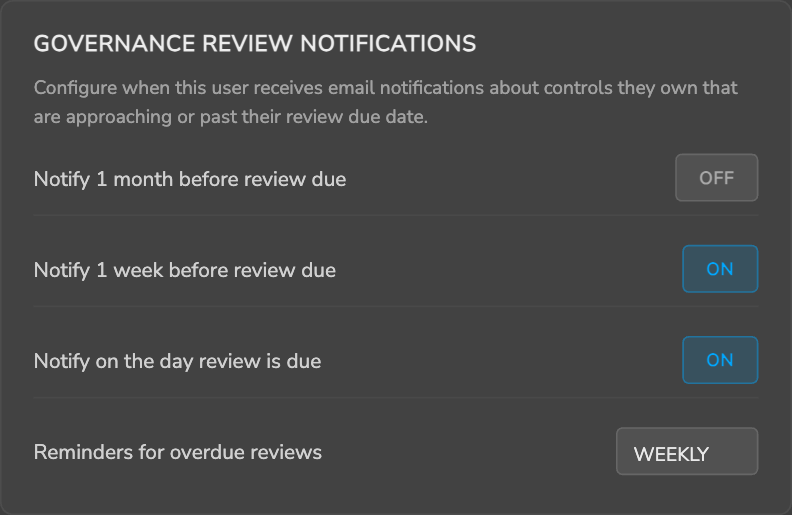
Notification windows include 1-month ahead, 1-week ahead, due today, and configurable overdue frequency (daily, weekly, or none). Preferences are managed in the user’s account settings.
Step 5 — Perform Periodic Reviews
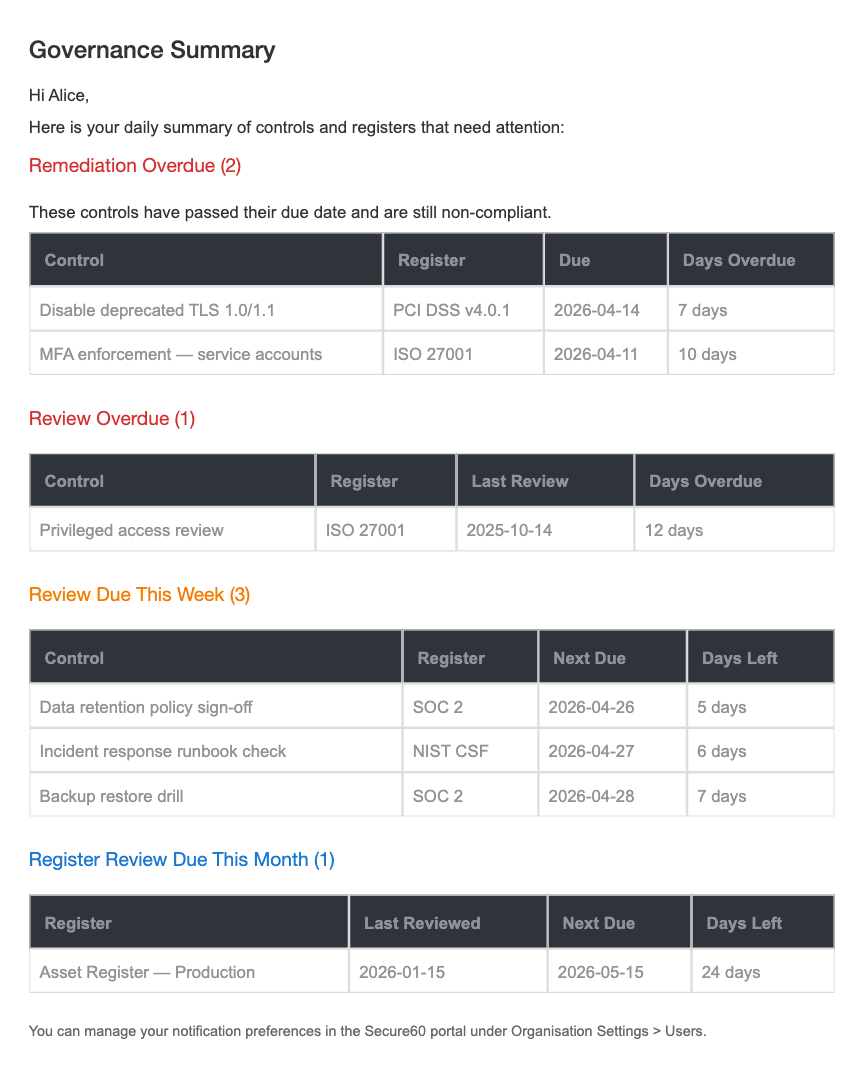
Once review periods are configured and owners are assigned, the review process runs on an ongoing cycle. Owners receive digest emails when their reviews are approaching or overdue.
Control Reviews
When a control review is due:
- Open the control in the assessment drawer
- Verify that the evidence and compliance status are still accurate
- In the Review section, click Submit Review
- Select the outcome: Confirmed, Issue Found, or Needs Action
- Add review notes documenting your findings
The system automatically records the review date and reviewer, calculates the next review due date based on the configured period, and adds the review to the control’s timeline history.
For controls that share a review cycle, use bulk review submission: select multiple controls using the checkboxes and submit reviews for all of them at once. This is particularly powerful when a group of related controls all need confirming on the same schedule — rather than opening each control individually, you can tick them off in one action.
Register-Level Attestation
Alongside per-control reviews, the register owner periodically performs a register-level attestation — a formal signoff confirming that the register as a whole is in acceptable shape. This is a lighter-weight review that creates an explicit audit-trail entry without cascading changes into individual controls.
- Open the register
- In the Register Review section, click Submit Register Review
- Select the outcome and add narrative notes
- Save
The Result: A Continuous Audit Trail
Every control review and register attestation is timestamped and recorded. Over time, this builds a comprehensive audit trail demonstrating that your organisation is actively managing its compliance obligations — not just assessing once and forgetting.
Step 6 — Automate Compliance Monitoring with Rules (Advanced)
As an optional next step, you can connect Secure60’s rules engine to your governance controls. This enables automated, real-time compliance monitoring — where a rule detects a condition in your security data and automatically updates a control’s compliance status.
How It Works
- Create a rule (or use an existing one) in Organisation Settings → Custom Rule Groups. The rule defines a condition to monitor — for example, checking that event volume from a critical system stays above a threshold
- Add an action to the rule with action type
update_control_status, specifying the target status (e.g.NON_COMPLIANT) - Link the rule to controls in your governance register using the rule configuration in the portal
- Apply the rule group to a project so the rule becomes active
When the rule’s condition is met, the linked controls are automatically updated to the specified status. The compliance rollup recalculates, and the control owner is notified through their normal review digest — the same notification workflow as manual reviews.
Example: Monitoring Data Flow for PCI DSS
PCI DSS requires continuous log collection from critical systems. You can create a rule that monitors whether event volume from your firewall drops below a minimum threshold. If data stops flowing — perhaps due to a misconfiguration or network issue — the rule fires and flips the relevant “Log Collection” control to NON_COMPLIANT. The control owner receives a notification, investigates, and remediates the issue. Once data flow resumes and the control is re-assessed, the owner marks it as COMPLIANT again.
This closes the loop between your security monitoring and your compliance programme — issues detected by the platform automatically surface as governance items that need attention, rather than waiting for the next manual review cycle.
For details on creating rules and configuring conditions, see the Rules documentation.
Quick Reference
| Step | What You Do | Outcome |
|---|---|---|
| 1. Deploy | Deploy a compliance framework template | Fully populated register with all controls |
| 2. Assess | Set compliance status per control | Baseline compliance posture with rollup |
| 3. Evidence | Attach documentation, URLs, files, and portal links | Auditable proof of compliance |
| 4. Review Setup | Assign owners and configure review cadences | Automated reminder workflow |
| 5. Review | Periodic re-assessment and register signoff | Continuous audit trail |
| 6. Automate | Link rules to controls (advanced) | Real-time compliance monitoring |
Need Help?
For questions about governance and compliance management, contact support@secure60.io.
For detailed feature documentation, see the Governance & Compliance Management Guide. For an overview of capabilities, see the Governance, Risk & Compliance Solution page.
 Back to top