Vulnerability Management
Overview
Secure60’s Vulnerability Management provides automated, SBOM-based vulnerability scanning across your Linux infrastructure. A lightweight client agent discovers installed software packages, generates a Software Bill of Materials (SBOM), and sends the inventory to Secure60. The platform then scans for known CVEs and raises threats automatically.
Key capabilities:
- Automated software inventory discovery using Trivy and CycloneDX SBOMs
- CVE detection with severity classification (CRITICAL, HIGH, MEDIUM, LOW)
- Full vulnerability lifecycle management with auto-closure when vulnerabilities are resolved
- Integration with Threats Overview for tracking, exceptions, and reporting
- Scheduled re-scanning every 6 hours via cron
Enable the Module
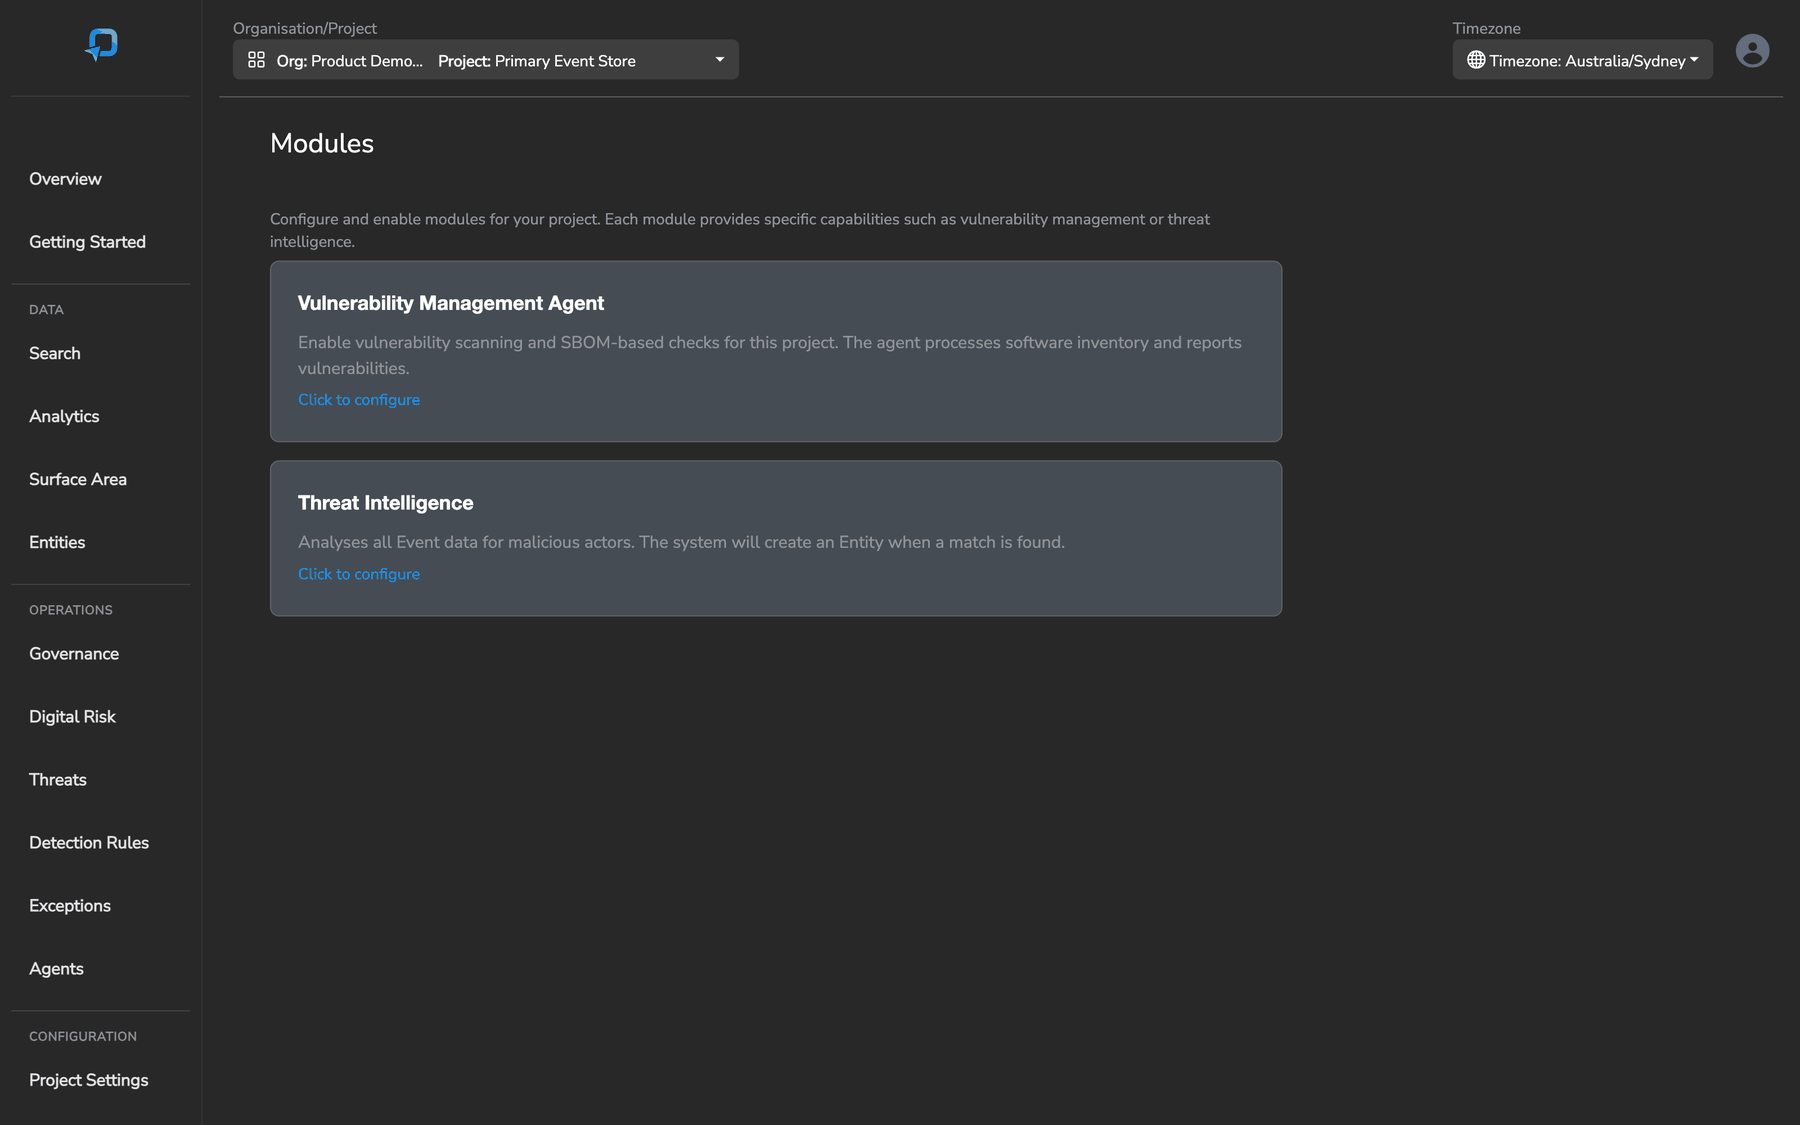
To use Vulnerability Management, the module must be enabled for your project:
- Navigate to Modules in the left-hand menu
- Locate the Vulnerability Management module
- Click to enable it for the target project
Deploy the Client (Linux)
Prerequisites
- Linux host (RHEL, CentOS, Rocky, Debian, or Ubuntu)
curlinstalled- Network access to your Secure60 Collector or Ingest endpoint
- Root or sudo access (for scanner installation and cron setup)
- An Ingest token and Project ID (Ingest mode) — see below
Create an Ingest token
For Ingest mode the client authenticates with a Secure60 Ingest token. Create one in the portal before running the client:
- Go to Organisation settings → Tokens tab.
- Click New / Add token, give it a name (e.g.
vuln-client), and add the project the host should report into. - Set that project’s access type to
INGEST(the available types areNONE,INGEST, andAPI; the inventory client only needsINGEST— do not use anAPI/admin token). - Save, then copy the generated token (the long JWT string). This is the value you paste at the JWT Token prompt or set as
TOKEN=for scripted installs.
You also need the Project ID of that project — it is shown on the Projects tab (and in the project’s URL/context). Use it at the Project ID prompt or as PROJECT_ID=.
The token is a credential — store it securely. Keep its scope to
INGESTon just the project(s) the host reports into, following least privilege.
Download the Script
Download the client script directly. The current client version is 1.08, which reports the package inventory before it announces the scan that produced it. Earlier versions announced the scan first, so while the inventory was still being delivered the host was shown against a scan that held no packages, and it disappeared from the Software Inventory views until the last package arrived — around 90 seconds for a typical server and several minutes for a host with a large package count. 1.08 also keeps any HOST=, IP=, FQDN= or environment= line you add to .env-s60-client-script: those were read on the run that followed but then dropped when the file was rewritten, so later runs reverted to the machine’s own hostname. (Version 1.07 records the actual package name for every entry in the inventory; earlier versions could report the distribution vendor in its place — an inventory listing “Rocky Enterprise Software Foundation” rather than the package — for any component the scanner did not label with a package identifier. 1.07 also retires any client older than 1.05 that is still scheduled on the same host: those versions installed their cron entry under a different filename, so an upgrade could leave the old one running alongside the new one and reporting the same host twice. Version 1.06 makes the scanner install repo-independent, so a broken or unreachable third-party package repository can no longer fail it. Version 1.05 sends the package inventory in batches — each scan makes a handful of requests instead of one per package, so large hosts report far faster and put much less load on the ingest endpoint. Version 1.04 added running-kernel detection so vulnerabilities on old, non-booted kernels are handled cleanly — see Non-running kernels.)
curl -O https://www.secure60.io/docs/s60-software-inv-agent-linux-1.08.sh
chmod +x s60-software-inv-agent-linux-1.08.sh
Or download it from the direct link.
Upgrading From a Previous Version
Already running an earlier version (e.g. 1.06)? Upgrading is a download-and-run — the script fixes up the existing install for you, with no manual cleanup:
-
Download 1.08 into the same directory as your current install — the folder that holds your existing
.env-s60-client-script. Your saved configuration (send mode, URL, Project ID, token) is reused automatically, so you are not asked to reconfigure.cd /opt/secure60 # the directory holding your existing .env-s60-client-script curl -O https://www.secure60.io/docs/s60-software-inv-agent-linux-1.08.sh chmod +x s60-software-inv-agent-linux-1.08.sh -
Re-run it — interactively, or non-interactively for fleets:
# Fleet / Ansible: converge config + cron + scanner without running a scan now (cron runs the first scan)
S60_SCRIPTED_INSTALL=1 S60_SETUP_CRON=1 S60_INSTALL_DIR=/opt/secure60 \
  ./s60-software-inv-agent-linux-1.08.sh --scripted --setup-only
On an interactive run, accept the cron prompt (Y) and the upgrade completes the same way.
The cron schedule is self-healing and idempotent: re-running detects and replaces the previous Secure60 inventory cron line — at any path, filename or version, including clients older than 1.05 that were installed under a different name — instead of adding a second one, so you never end up with competing scans. The lines being replaced are printed as it runs. Only the Secure60 inventory line is touched; your other cron jobs are left alone. Once the new schedule is in place the previous script file is no longer run and can be deleted. Re-running is always safe.
Interactive Install (First Run)
Run the script without any flags for a guided setup:
./s60-software-inv-agent-linux-1.08.sh
You will be prompted for:
- Send mode — Collector (on-prem) or Ingest (cloud)
- Endpoint URL — Your Collector address or Ingest base URL (e.g.
https://ingest.secure60.io) - Project ID — Your Secure60 project ID (Ingest mode only) — from Organisation settings → Projects
- JWT Token — Your Ingest token (Ingest mode only) — create it under Organisation settings → Tokens with access type
INGEST(see Create an Ingest token above)
Configuration is saved to .env-s60-client-script in the same directory as the script. Subsequent runs will use this file automatically.
Early in the first run — before the scan starts — you will be prompted to set up a cron job to run the scan every 6 hours, so the schedule is in place even if the first scan runs long.
The first scan can take several minutes. The scan walks the whole filesystem to build the inventory. The script prints a heartbeat (
... still scanning — Nm elapsed) so you can see it is still working — please don’t interrupt it.
Silent / Scripted Install
For automated deployments (e.g. Ansible, Puppet, or shell scripts), use the --scripted flag with environment variables:
export S60_SCRIPTED_INSTALL=1
export S60_SEND_MODE=ingest
export S60_INGEST_BASE=https://ingest.secure60.io
export PROJECT_ID=313
export TOKEN=eyJhbGciOiJIUzI1NiIs...
export S60_SETUP_CRON=1
export S60_INSTALL_TRIVY_IF_MISSING=1

./s60-software-inv-agent-linux-1.08.sh --scripted
Environment Variables Reference
| Variable | Description | Example |
|---|---|---|
S60_SEND_MODE |
Send mode: collector (on-prem) or ingest (cloud). Required. |
ingest |
S60_COLLECTOR_BASE |
Collector endpoint URL. Required for collector mode. | https://192.168.1.100 |
S60_INGEST_BASE |
Ingest base URL. Required for ingest mode. | https://ingest.secure60.io |
PROJECT_ID |
Secure60 project ID. Required for ingest mode. | 313 |
TOKEN |
Ingest token (JWT) used as the Bearer credential. Create under Organisation settings → Tokens with access type INGEST. Required for ingest mode. |
eyJhbG... |
HOST |
Hostname override. Auto-detected if not set. | web-server-01 |
IP |
Host IP address. Optional metadata. | 10.0.1.5 |
FQDN |
Fully qualified domain name. Optional metadata. | web-server-01.example.com |
environment |
Environment label. Defaults to Production. |
Production |
S60_SETUP_CRON |
Set to 1 to automatically install a cron job (every 6 hours). |
1 |
S60_INSTALL_DIR |
Install directory. Cron will reference this path. | /opt/secure60 |
S60_CRON_LOG |
Log file path for cron output. Logrotate configured automatically. | /var/log/s60-sbom.log |
S60_INSTALL_TRIVY_IF_MISSING |
Set to 1, Y, or yes to auto-install the scanner if not found. |
1 |
S60_TRIVY_VERSION |
Scanner version installed by the auto-install paths. Pinned to a known-good release rather than latest. Bump after review; set to latest to opt back into the newest (not recommended). |
0.71.2 |
S60_INSTALL_LATEST_TRIVY_REPO |
Set to 1 to allow falling back to the scanner's public package repository (pinned version, then latest) when the Secure60-hosted package is unavailable. Off by default. |
(unset) |
S60_INGEST_BATCH_SIZE |
Number of inventory package events sent per HTTP request (as newline-delimited JSON). Default 1000. Lower it only if a proxy or collector rejects large request bodies; raise it to send fewer, larger requests. |
1000 |
Scanner Installation
The client needs its scanner binary on the host. By default it installs from a trusted source, and only uses the public package repository if you explicitly allow it.
Install order:
- A local package file you provide (
S60_TRIVY_PKG_FILE) — fleet tooling copies a verified.rpm/.debto the host.- The Secure60-hosted package downloaded from
S60_TRIVY_PKG_BASE(defaulthttps://www.secure60.io/docs).- The public package repository (pinned version, then latest) — only when you opt in with
S60_INSTALL_LATEST_TRIVY_REPO=1(or--install-latest-trivy-repo); interactive runs prompt you.Steps 1–2 are SHA256-verified against a known-good checksum and installed via the package manager, so the scanner registers in the OS package database and is itself covered by vulnerability scanning. The pinned version is currently
0.71.2; override withS60_TRIVY_VERSION(and the matching checksum) after reviewing a new release.
Auto-install during scan (uses the trusted source; prompts before any public-repo fallback):
./s60-software-inv-agent-linux-1.08.sh --install-trivy-if-missing=Y
Install the scanner only (no scan):
./s60-software-inv-agent-linux-1.08.sh --install-trivy-only
Allow the public package repository (only if you can’t use the trusted package):
S60_INSTALL_LATEST_TRIVY_REPO=1 ./s60-software-inv-agent-linux-1.08.sh --install-trivy-only
# or: ./s60-software-inv-agent-linux-1.08.sh --install-trivy-if-missing=Y --install-latest-trivy-repo
Supported distributions (both trusted-package and repo paths):
- RHEL / CentOS / Rocky — installs the
.rpmviadnf/yum - Debian / Ubuntu — installs the
.debviaapt
Enable Cron (Scheduled Scanning)
To keep your software inventory and vulnerability data up to date, set up a cron job to run the scan automatically every 6 hours.
Option 1: During interactive install
The script will prompt you to set up cron early in the first run, before the scan begins.
Option 2: During scripted install
export S60_SETUP_CRON=1
./s60-software-inv-agent-linux-1.08.sh --scripted
Option 3: Manual cron entry
0 */6 * * * /opt/secure60/s60-software-inv-agent-linux-1.08.sh --scripted >> /var/log/s60-sbom.log 2>&1
When cron is set up automatically, log rotation is also configured at /etc/logrotate.d/s60-sbom (weekly rotation, 4 weeks retained).
Configuration File
All settings are saved to .env-s60-client-script in the same directory as the script. This file is used automatically on subsequent runs and by the cron job.
Example configuration (Ingest mode):
S60_SEND_MODE=ingest
S60_INGEST_BASE=https://ingest.secure60.io
PROJECT_ID=313
TOKEN=eyJhbGciOiJIUzI1NiIs...
HOST=web-server-01
IP=10.0.1.5
FQDN=web-server-01.example.com
environment=Production
Example configuration (Collector mode):
S60_SEND_MODE=collector
S60_COLLECTOR_BASE=https://collector.internal:8443
HOST=web-server-01
Viewing Your Data
Once the client has run and sent data to Secure60, you can view software inventory and vulnerability information across two main areas.
Surface Area — Software Inventory
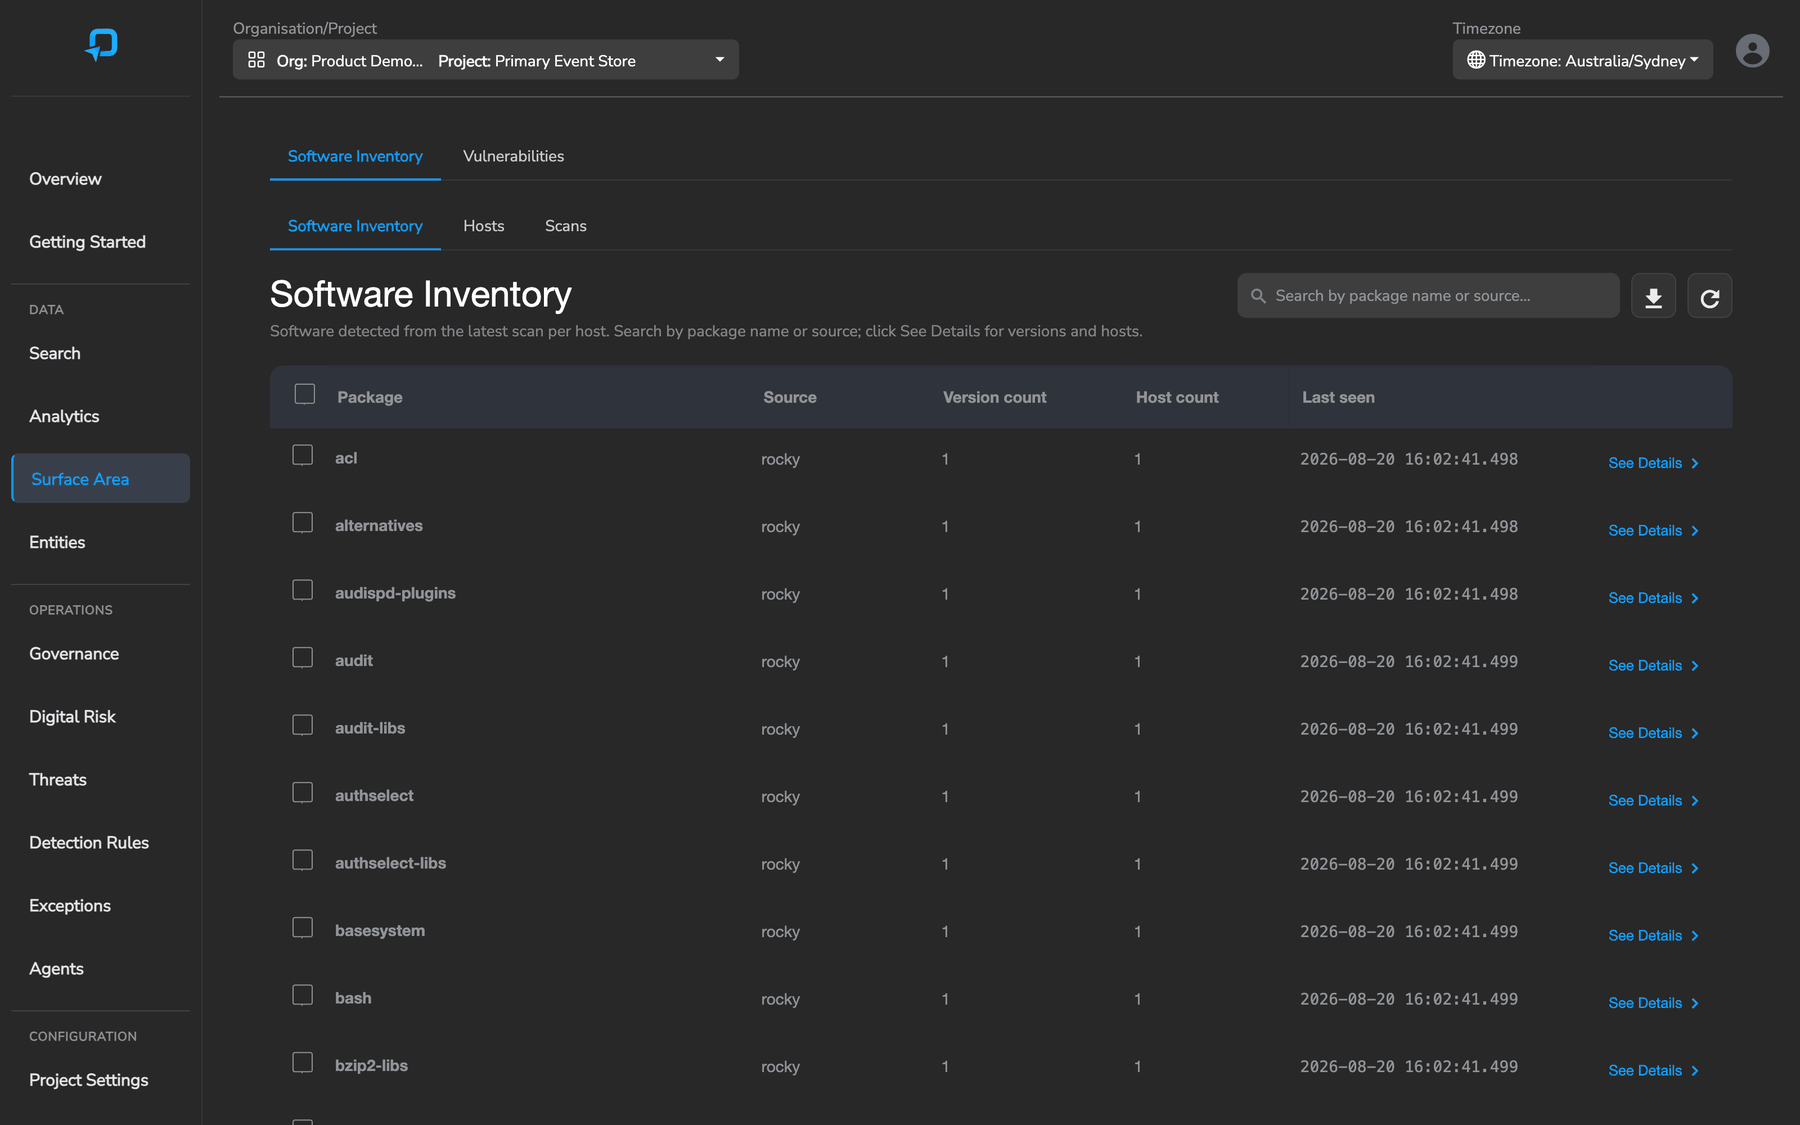
Navigate to Surface Area and select the Software Inventory tab.
This view shows all discovered software packages across your scanned hosts:
- Software — Package name
- Source — Package type (e.g. rpm, deb, pip)
- Version Count — Number of distinct versions detected
- Host Count — Number of hosts with this package installed
- Last Seen — When the package was last reported
You can search, sort, and export the inventory to CSV.
Surface Area — Vulnerabilities
Select the Vulnerabilities tab on the Surface Area page.
This view shows all detected CVEs across your infrastructure:
- Vulnerability ID — CVE identifier (e.g. CVE-2021-47548)
- Package — Affected package name
- Severity — CRITICAL, HIGH, MEDIUM, or LOW
- Installed Version — Version currently installed on the host
- Fixed Version — Version that resolves the vulnerability (where available)
- Host Count — Number of hosts affected
Vulnerabilities that only affect an installed-but-not-booted kernel are marked with a NON-RUNNING KERNEL badge, and a Hide non-running kernel toggle lets you focus on actionable findings. These are recorded for visibility but do not raise threats — see Non-running kernels.

Threats Overview
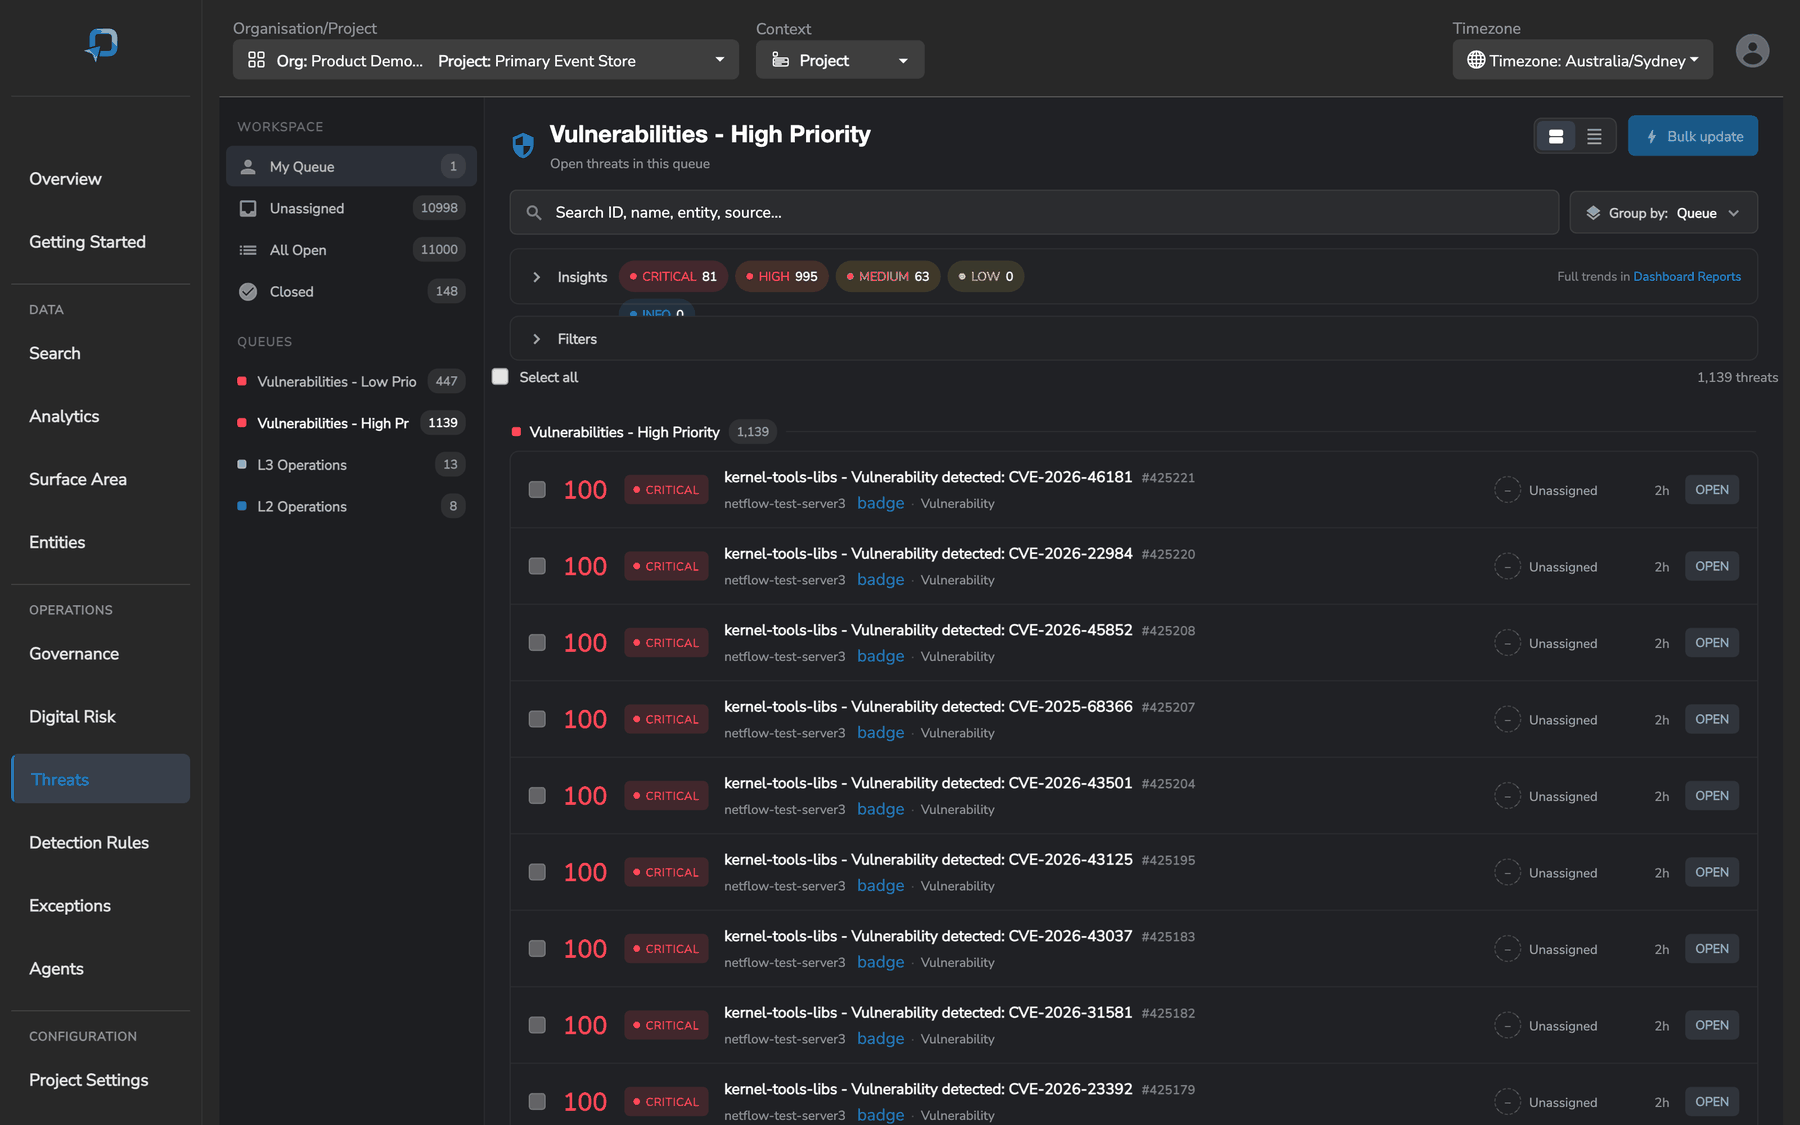
Vulnerability findings are automatically raised as Threats on the Threats Overview page. These threats appear with the source label Vulnerability. For how the overview, threat groups, states, responses, and reporting work across all threat sources, see Threat Management.
From Threats Overview you can:
- View and triage vulnerability threats alongside other threat sources
- Manage lifecycle — track threats through investigation, response, and closure
- Create exceptions — mark accepted risks or false positives
- Auto-closure — when a vulnerability is no longer detected in subsequent scans, the associated threat is automatically closed (see Vulnerability Lifecycle below)
Vulnerability Lifecycle
Vulnerability threats follow a structured lifecycle from discovery through to resolution. Understanding each stage helps you manage and prioritise your security posture effectively.
1. Discovery
The Secure60 vulnerability client runs periodic scans on your hosts, collecting a software inventory (SBOM). The platform analyses this inventory against known CVE databases to identify vulnerabilities in installed packages.
2. Threat Creation
Vulnerabilities that meet or exceed your configured minimum severity threshold (set in Modules → Vulnerability Management) are automatically raised as threats. Each threat includes the CVE identifier, affected package, installed and fixed versions, and a severity classification.
3. Deduplication
The platform uses a correlation key — a unique fingerprint based on the vulnerability source, host, CVE, and package — to prevent duplicate threats. If a vulnerability is already tracked as an open threat on the same host, a new threat is not created.
4. Triage and Investigation
Once threats appear on the Threats Overview page, your team can:
- Assign owners to specific vulnerability threats for accountability
- Add investigation notes to document findings and remediation progress
- Link to Surface Area to see all affected hosts and package versions at a glance
5. Auto-Closure (Remediated)
When the Auto-close remediated threats setting is enabled (Modules → Vulnerability Management), the platform automatically reconciles open threats after each scan. If a subsequent scan no longer detects a CVE on a host — for example, because the package was upgraded — the corresponding threat is closed with a Remediated outcome and an audit note recording the scan that confirmed the fix.
This ensures your threat list stays current without manual intervention. Auto-closure only applies to threats created by the vulnerability manager and only when the vulnerability is absent from the scan results.
6. Manual Closure
You can close vulnerability threats manually at any time by setting an appropriate outcome:
- Remediated — the vulnerability has been fixed
- False Positive — the finding does not apply to your environment
- Benign — the vulnerability exists but poses no practical risk
- Duplicate — the finding is already tracked elsewhere
7. Exceptions
For known and accepted risks, create an Exception on the Threats page. Exceptions suppress future threat creation for a specific vulnerability and host combination, so accepted risks do not reappear as new threats in subsequent scans.
Non-running kernels
Linux distributions keep several kernels installed at once (the running one plus recent previous versions), so a scan legitimately reports vulnerabilities for old kernels that are installed but not currently booted. From client version 1.04 onward, Secure60 detects the running kernel (uname -r) and treats vulnerabilities that only affect a non-running kernel as informational:
- they are still recorded and listed (flagged NON-RUNNING KERNEL in Surface Area → Vulnerabilities), so you keep full visibility;
- they do not raise a threat; and
- any existing threats for a kernel that is no longer running are auto-closed on the next scan.
Vulnerabilities affecting the running kernel are treated normally and raise threats. To clear non-running-kernel findings entirely, remove the old kernel packages on the host — for example package-cleanup --oldkernels --count=1 (RHEL/CentOS/Rocky) or apt autoremove (Debian/Ubuntu) — and the findings drop off the next scan.
How It Works
- Client agent runs a software inventory scan on the host to generate a CycloneDX SBOM (Software Bill of Materials)
- SBOM is transmitted to Secure60 via Collector or Ingest as individual package events
- Secure60 platform reconstructs the SBOM and runs a vulnerability scan against known CVE databases
- Vulnerabilities are matched to installed packages and raised as threats with severity classification
- Reconciliation — open threats are compared against the latest scan results; vulnerabilities no longer detected are auto-closed (when enabled)
- Subsequent scans continuously update the inventory, raising new threats and closing remediated ones
Need Help?
For questions about Vulnerability Management setup or configuration, contact our team at support@secure60.io.
 Back to top